Saturday, April 29, 2006

My cukes probably bit the dust

My cucumbers don't look too good. It has been almost a week since the 7.9 inches of rain fell in one day, and they look shriveled up to me. I think those poor suckers drowned! We haven't had frost, so it must have been the heavy soaking cutting off the oxygen supply.

Luckily, I have 4 other plants I didn't put outside, so there are spares. On top of that, I usually seed directly outdoors anyway so I wouldn't be any further behind schedule even if the 4 spares don't make it.

Monday, April 24, 2006

Lots and lots of rain yesterday

Yesterday the TV weatherman said my town got 7.9 inches of rain in 24 hours.

Although the rain was beneficial, my poor cukes would have drowned if they were not in raised beds. And so would my garlic. Even in raised beds, almost 8 inches of water over 24 hours is not a great idea. I looked at the cukes late yesterday and they were drooping. I'll check them again tonight and hopefully they will have perked up by then.

Saturday, April 15, 2006

I put some cukes in the ground today

Okay, Okay. I did say a couple of days ago that I would wait 2 more weeks before putting cucumbers into the ground, but I only put half of them in today. The weather is supposed to be good for the next 8 days; no frost is forecast. And even if it gets close to frost, since I only put one little row in they can easily be covered with 1 or 2 large plastic tubs for a night.

It felt good to plant something!

Friday, April 14, 2006

Raised beds

Why raised beds? Many reasons, actually. For one thing, drainage is much better in raised beds. A couple of summers ago we had more rain than usual, and a lot of gardens were waterlogged. All plant roots need to breathe, and if the roots are sitting in water all the time they cannot get any oxygen. It's not a pretty sight.

For another thing, raised beds allow gardening without trampling on the soil near the plant, and no trampling means more oxygen can get to the roots. Packed-down soil is not good for plants. Soil in raised beds warms up earlier in the season, so you can plant earlier. The plants are a little higher so they are easier to work with. You don't have to stoop as much to weed or to water. Fertilizer is easier to apply because you know exactly how big an area you are trying to feed. If pests are a problem, it's usually easier to protect crops in raised beds. If your backyard soil is a problem, you can fill a raised bed with whatever kind of soil you buy. And raised beds bring a certain neatness and organization to your garden.

Here is a view of my raised beds from my bedroom window:


There are 7 beds total. Each one is 8 feet long by 4 feet wide and about 10" tall. Beds 3 and 4 look darker than the others because I spread out some compost. Rain will leach the nutrients into the soil, and in 3-4 weeks I will turn the soil over. I ran out of homemade compost and today I bought some "garden soil" at Home Depot and I put that into beds 1 and 2, but this picture was taken before that.

Thursday, April 13, 2006

Too early for cukes outside?

In the past, I've sown cucumber seeds directly outside at the end of May. This year, I decided to start my cucumber seeds indoors, and since today was such a nice day I'm sorely tempted to put them in the ground. It's about 70 degrees out there now!

The only thing holding me back is that the last frost date in these parts is usually Mid-April, and today is only April 13th. What if in a few days it turns colder than usual and there is a frost? I can't take that chance, so I'll have to wait a couple of more weeks before I put my cukes in the ground.

Tuesday, April 11, 2006

The Pixie Tomato

The first time I got an urge to grow a tomato plant, I was living in a condo. We were not allowed to plant anything in the ground there, so my only choice was to try to grow one indoors in a pot. Having grown houseplants before, and having a nice sunny window in the condo, I was optimistic. But I had to find a small enough variety to grow in a pot.

One day I was at Xpect Discount, looking at the gardening stuff, and I spotted a little 6-cell growing pack with a plastic dome and a packet of Pixie tomato seeds. This little kit was put out by Burpee, the manufacturer of the Pixie seed. Being a hybrid (a cross between two other seeds), it has to be "manufactured", probably by mad scientists in white lab coats.

On the kit it said that this tomato plant can be grown in a pot, so I grabbed a kit and followed the directions on the seed packet. A few days later I had tomato plants! The Pixie did indeed grow in a pot, and indoors to boot! When the plant made flowers, I had to pollinate them manually by rubbing a Q-tip or a small cheapo watercoloring brush on the flowers. Outdoors the flowers get pollinated by insects or the wind, but indoors someone has to take the place of bees and spread pollen from one flower to another. The plant actually set tomatoes, although not many of them, and in due time they ripened.

The Pixie is a very hardy, short, compact determinate plant with broad dark-green leaves. The tomatoes range in size from cherry tomatoes to maybe three times the size of cherry tomatoes. It only grows to about 3-4 feet tall, puts out a lot of tomatoes pretty much all at once, and then withers away. Outdoors, the fruits ripen in about 52 days from going into the ground, which is quite a bit faster than the about 72 days it takes for Better Boy to mature its fruits. It produces a lot of fruit for a shortie, maybe 25-30 per plant. In fact, the stems have to be given extra support because they get so heavy with fruit and a few of the stems break if not supported. The fruit is a bit thick-skinned, but still tasty.

Below is a picture of some Pixie tomatoes shortly after birth:


Now for the bad news. Burpee stopped making the Pixie seeds a few years ago, and this spring I have used my last packet of Pixie seeds. The seeds were from 2000, so Burpee has not made them since then. I emailed them and called on the phone, asking them to please make the Pixie again, but they would not. I was told that the next closest thing to Pixie was 4th of July, so I tried some of those seeds and they were okay but they are no Pixie.

You could say that I just used the last of a dying seed.

Sunday, April 09, 2006

What kind of tomatoes do I grow?

My main crop is Better Boy. Why? The Ortho book "All About Vegetables" says this about it: "Main crop, 12 to 16-ounce uniform fruit. Heavy cropper, Rugged." It sounded good to me 8 years ago and Better Boy have performed very well for me.

In a cherry tomato, I used to grow Super Sweet 100 but the plants would grow wild. Lots and lots of stems, and also lots of tomatoes! It's hard to keep it pruned to one main stem (or two) like you're supposed to do with tomato plants. The darn thing would just grow every which way!

My friend Andy from work has a daughter, and she is quite the horticulturalist. She's even written articles on the subject! A couple of years ago she sent me a Sweet Baby Girl cherry tomato plant, and that was great! The taste of Super Sweet 100, if not better, and a more manageable plant. The fruits are a little larger too, which never hurts. The Sweet Baby Girl has become my cherry tomato of choice.

I also grow Marglobe, a medium-size tomato with a sort of pinkish/purplish color like Brandywine but a little less fussy than Brandywine. Both of them are delicious, probably the best tasting tomatoes I've grown, but they are somewhat problematical to grow. Sometimes they get rot, sometimes the fruits are misshapen, sometimes they crack early. I put maybe 4 Marglobe out in the garden but I don't rely on good luck with them. I rely on the Better Boys and if the Marglobes do well then it's a bonus.

4th of July is an early tomato, about twice the size of a cherry tomato. A better name might be 20th of July, because they are never ready for me on the 4th! But they are tasty, early, and a decent cropper.

Next, I'll post about the Pixie tomato.

Saturday, April 08, 2006

Growing seedlings in a basement

Since I don't have a windowsill that gets lots of sun, I have to grow my seedlings in the basement. To do so, I use fluorescent light because incandescent light is not good for growing plants. The light has to be very close to the top of the seedlings, so the ideal setup is one which can be raised up as the seedlings grow. Shop lights are great for this purpose because the units can be hung on chains and moved up and down as required. To hang the shop lights, I built a wooden frame as shown below.


I have 3 shop lights hanging on the table, with 2 40-watt fluorescent bulbs in each shop light. As you can see, the lights are fairly close to the seedlings. As the seedlings grow, I move the lights up by putting the s-hook through a different link in the chain.

You may notice a timer in the outlet below the table. It turns the lights on in the morning and off at night, simulating the length of a day. The seedlings need dark at night, just as in nature.

One of the advantages of growing the seedlings in a basement is that the temperatures are lower there, and the seedlings don't grow too fast; they don't get long and thin. When the seedlings get leggy, sometimes the stems are not strong enough to support the top leafy growth. Short, stocky seedlings are stronger and hardier. As my good friend Dick taught me, cooler temperatures allow the root system to develop but keep the seedlings more compact. On the other hand, I don't let it get too cold down there. If the temperature gets down close to 50 degrees, I turn on the heater to bring it closer to 60 degrees.

Friday, April 07, 2006

Seed starting


Seed starting is actually a lot easier than most people think. About 3 weeks ago I gave a little demo to some friends at work, and they each got to plant their own tomato seeds during the demo. I'm delighted to say that each one now has baby plants!

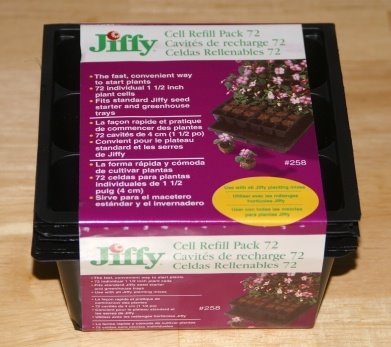
All you need to start seeds indoors is: seed starting soil, a container , seeds, a misting bottle with tap water in it, and a way to keep moisture in the container. In the demo we used small plastic cups with a larger plastic cup on top as a dome to keep in moisture. Since I start a lot of seeds, I use Jiffy cell refill packs. Each package as seen above has eight separate trays, with 9 cells in each tray for a total of 72 cells.

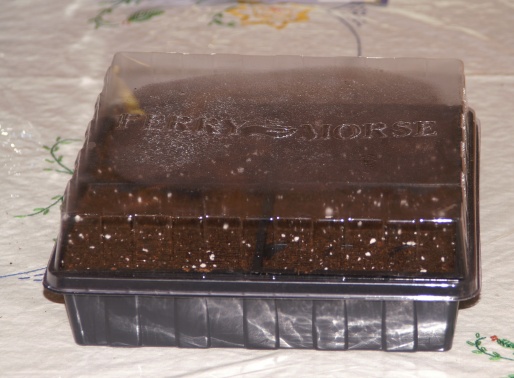
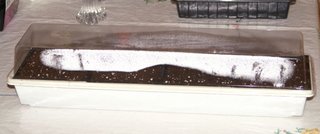
Seed starting soil can be bought at any garden center or Wal*Mart or Kmart or similar stores. No long discussion needed for that! Then you need your seeds, of course, and a way to keep moisture in while your seeds are germinating. I use little plastic greenhouses that also come from garden centers or discount stores. Some are black and square, some are white and long but they all should come with a plastic dome that fits on top of the tray to keep moisture in. The Jiffy cells fit perfectly in each of these; 4 in each.


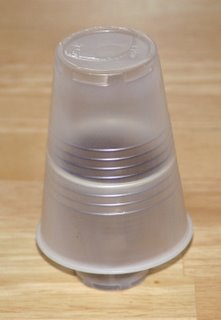
For just a few seeds, you can create your own individual mini-greenhouses from 3-oz plastic cups topped by 5-oz plastic cups as shown below. Make sure to punch a couple of drainage holes in the bottom of the small cups because your plants will stay in that cup for a few weeks and you will have to water them.


So how do you actually start seeds, and when? Plan on starting tomato seeds about 6-8 weeks before putting them in the ground. In Connecticut we put them into the ground at the end of May so late March or early April is a good time for me to start the seeds.

Put seed starting soil into your container. Fill each Jiffy cell almost to the top but leave just over 1/4 inch. Knock the cells lightly down on the table 4 or 5 times to settle the soil because seed starting soil is very loose and light. In a week or so, when you start watering, if the soil is too loose it will shift when you water so we want to pack it just a little tighter in the beginning. Add more soil if necessary to bring the top of the soil within 1/4 inch of the top of the cell. Put your seed in the middle of each cell. You can give the seed one or two sprays from the mister, just to get a little moisture on the seed. Moisture (and warmth) is what triggers the seed to sprout. Cover it with about 1/4 inch of seed starting soil, just about to the top of the cells. Give a few more sprays from the mister to make the top of the soil rather damp. I usually give about 15 or 20 sprays, but we are talking about mist here, not a waterfall! This is all the water your seeds will receive until they sprout. Place the container into one of those greenhouses and put the lid on. Put the plastic greenhouse away from direct sun but in a warm spot in your house. Then, just wait for about a week! Your seeds should sprout in 5-10 days.

I usually put two seeds into each cell just in case one of them doesn't germinate. If both seeds germinate, I pull the weaker one or the one off-center and leave the better one. I'd rather waste seeds than space. A cell without a seedling is a waste of space.

Once they sprout, they must be put into direct sunlight or fluorescent light right away. If they are put in a sunny window, turn your container every couple of days so that the plants don't lean just one way reaching for the light. In the next post, I'll show you my fluorescent light setup in the basement. Sadly, I don't have a good windowsill with sun, so I have to manufacture light, but there are advantages to that as well.

Thursday, April 06, 2006

I love eating tomatoes.

Not the sorry excuses sold in supermarkets year-round here in the Northeast, but REAL tomatoes. In season, out of the garden. Ripe, sweet, juicy, delicious tomatoes.

I also like to watch things grow, so it's no wonder I like to grow my own tomatoes. It makes me feel like I'm not only enjoying nature, but participating in it. Encouraging it. Embracing it. And when it comes to pests, fighting it!

Over the next few weeks, due to the encouragement of a friend (thanks, Shelly!) I hope to share my love of tomato gardening in this blog.