Monday, May 29, 2006

Tomato cages

You could plant your tomato seedlings and then just let them grow as they please, sprawling on the ground, but that's not a good idea. When touching the ground, tomatoes tend to rot because they are almost always moist on the bottom. When on the ground, bugs can reach them very easily. For those reasons and more, most people grow tomato plants upright, supported either by stakes or cages.

I choose to support my plants with cages because they afford more protection to the plant, the stems are touched a lot less, and they seem better supported in cages than by stakes. I've also read that tomatoes produce better when caged. I use mostly 54 inch cages.


Since the cages tend to wobble from side to side, I use one stake per cage to steady it. I sink a stake at least a foot into the ground by hitting it with a rubber mallet, then I tie the cage to the stake with a 6" plastic cable tie. After snipping off the extra length of the tie, it looks like this:


When tied to the stakes, the cages are much more stable and will support the tomatoes better.

If you choose to stake them rather than cage them, just remember to tie the stems to the stake a little loosely and with material that will not dig into the stem of the plant. String is not a good idea; it will cut into the stem. A lot of people use strips of old pantyhose because they stretch and "give" a little. They are also gentle on the stem. Some people use a stretchy green plastic tape sold in garden centers. I use that myself, especially when staking Pixie branches that have overflowed their cages. Pixie branches grow heavy with tomatoes because the plant puts them all out at the same time, and if the branches are not supported they will at best bend and at worst break. So caging my Pixies is not enough; I need to stake the branches later in the season and for that I use the green plastic tape.

Saturday, May 20, 2006

How to plant tomatoes

Planting tomato plants is fairly easy. It's best not to do it during midday on a sunny day because the full sun tends to be too strong for seedlings to take right away. Try to plant on a cloudy day or in late afternoon. I've planted during full sun and the plants tend to droop pretty quickly. They need to absorb water before the sun hits them with full force.

Water your plants before putting them in the ground. Space tomato seedlings about 2 feet apart in rows 3 feet apart. With a shovel or a trowel, dig your hole. Make it deep enough so that no more than 4 or 5 inches of the plant will be above ground. The more of the plant is above ground, the more it sways in the breeze and the more danger there is of the stem bending or breaking. Loosening the dirt around the future location of the plant is a good idea too, so that the roots have loose soil to dig into rather than packed soil to dig into. If your plant has branches that would be below ground, pinch them off first. If your plant is tall and thin (referred to as "leggy") and you can't dig a hole deep enough to put the plant in vertically, you can dig a horizontal trench, lay the plant down on its side, and GENTLY turn just the top of the plant up so it will be sticking out of the ground. Roots will form all along a buried tomato stem, helping the plant draw in moisture and nutrients.

I use pelleted fertilizer that goes into the hole before I plant, so I don't worry about fertilizing after the plant is in the ground. The brand I use is Osmocote but now Miracle-Gro has also come out with pelleted fertilizer. So if you decide to use these pellets, put those in first according to the directions on the package, swish them around with your trowel or your hand so that they are not all clumped together in one part of the hole, and then put the tomato plant in. As the roots grow they will go down beneath the pellets of fertilizer and every time your plants are watered and the fertilizer dissolves a tiny bit, the pellets will feed the roots little by little.

Once you have put the plant in the hole, fill the rest of the hole with the dirt you got from digging the hole, and pack the soil a little bit around the plant so it will not move when it's watered because loose soil tends to shift when wet. To firm the soil, I use both hands and just give the soil around the seedling a push down into the ground to sort of "set" it. It's hard to describe just how much pressure to use, but use your judgment and don't pound on the darn thing!

If you are worried about cutworms, you need to take some precautions here. A cutworm travels just under the surface of the soil and will chop your seedlings off at the base, much like a lumberjack cuts down a tree. I've had a cutworm chop one of my plants and it's not a pretty sight. To protect against cutworms, all you have to do is to put up some kind of barrier around your seedlings for about an inch into the ground. Cutworms will not dig deeper than that. Some people put a ring of newspaper around their plants, because it's easy, cheap, and the newspaper will decompose eventually. After tomato plants have been in the ground for 2 or 3 weeks, the stems are probably too strong for a cutworm to chew through, so the cutworm protection really only has to last for 2 or 3 weeks.

As cutworm protection I use plastic pots with the bottoms cut out of them. The bottom needs to be removed so the roots can grow down into the soil. I position the cut-out pot so that about an inch is below ground and about an inch or two is above ground. The added benefit to this type of cutworm protection is that the top of the pot makes a nice funnel when watering. I water from the bottom, meaning I water the soil and not the leaves. That's a story for another day... When watering from the bottom, not only do I water around the cut-out pot but I make sure to fill the funnel a couple of times and I know the roots will get watered well. And these cut-out pots are reusable year after year.


I scoop out a "bowl" around my plants so that when I water the water pools up near the plant and is sure to go down to where the roots are. It does no good to water 2 feet away from the roots! Then you're just watering weeds. Later, when mulch is applied (that's for another posting) the bowls remain uncovered.


After planting, water right away to settle the dirt and to give the plant enough moisture to withstand the elements.

Friday, May 19, 2006

I planted some tomatoes yesterday

The weather finally cooperated and I was able to put some tomatoes in the ground yesterday. We've had a stretch of very wet weather here in New England but the rain stopped long enough for me to plant about a dozen tomato plants.

I planted some Pixie, a few Sweet Baby Girl, some Marglobe, a couple of 4th of July, and some Better Boy. I also replaced the 4 cucumber plants that got drowned a couple of weeks ago when we had about 8 inches of rain in 24 hours.

And of course, now it's raining! But that's okay because it makes the soil around the plants settle. In the next couple of days I will plant some more seedlings and put tomato cages and fencing up. Sometimes the deer and groundhogs think my raised beds are the salad bar, so I have to keep them out.

Saturday, May 06, 2006

Turning the garden over

Plants grow best in loose, airy soil. Packed soil makes it harder for oxygen to get to the roots, harder for the roots to spread out, and makes for poorer drainage. Plants don't grow well in packed soil.

The best way to assure loose, airy soil is to rototill or to turn the soil over with a shovel. Another reason to turn the soil over is that if you put compost or other enriched soil on top of your garden, it needs to be worked into the soil so it's available to the plant at root level. Since I have raised beds, it's not practical to rototill so I turn my soil over with a shovel.

That's what I'll be doing today... turning soil over. Fun, fun, fun!

Hardening Off


A few days before tomato plants go into the garden, they should be put outside to get accustomed to the conditions. This is called hardening off, as the plants need to get hardened to the weather.

I'm lucky that I have a screened-in porch that gets some sun in the morning only. Like humans, tomato plants will get sunburn if they are exposed to too much sun right away. They need a little sun at a time, to get used to it.

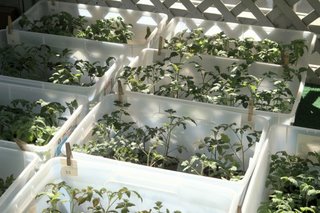
I transplant my seedlings from the black plastic Jiffy cell packs to individual peat pots. The peat pots that are 3 inches across at the top work best for me. The pots then go into clear plastic storage boxes about a foot high and maybe 2 feet wide. The boxes go out on the porch for some morning sun, and besides getting some sun from above, the clear plastic sides of the boxes allow more light in from the side. At night, I bring the boxes inside and stack them one on top of another as long as my plants are shorter than the height of the box they are in (otherwise the plants would get squished by the box on top).

The clear storage boxes are a good way to move plants inside or outside in a group, and the height of the boxes protect the seedlings from breezes. You don't want the poor plants to be thrown about in the wind!

When the low temperature for the night is supposed to be 45 or above, I leave the plants outside all night. What doesn't kill them makes them stronger, right? If it's supposed to be fairly windy, I bring them inside.

If you don't have plastic storage boxes to protect your plants, they say to put your plants outside in a sheltered spot. I guess they mean sheltered from too much sun, wind, and pets or varmints. After 10 days of hardening off, your tomato plants should be ready for prime time in your garden!